Commercial Printing Tips: Understanding Ink Coverage
Here at Universal Printing, we love “Good Design.”  Not only do we have our own talented Design professionals in-house, but we’ve been fortunate to work with a number of amazing Ad Agencies and Independent Designers from around the country. Everyone has their own style and work habits, but almost all of them have one thing in common: They always want tips, suggestions, and feedback from their Printing Partner.
One of the easiest and most helpful ways to improve the design, runability, and final impact of a piece, is to avoid unnecessary ink saturation. Too much ink an any one spot can lead to printing and drying issues, which in turn effect everything from how quickly your project can be printed, to possible issues in the cutting and finishing of your project. Too much ink layered on top of each other can lead to other prblems like “plugging” or “muddying” your photos. But don’t fret — we’re here to help! Let’s start with this adorable puppy in a tiny rocking chair in the above image. He looks like he could sell something, or at least make sure your target audient give him a second look! Time to figure out how to maximize his impact, and keep is adorable little puppy face neat and clean!
What is Total Area Coverage?
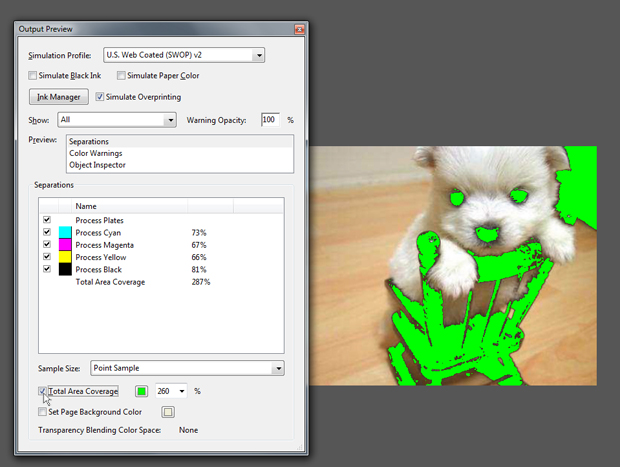
 For Black & White, or Monochrome images, this is easy to understand. Dark shadow areas might be in the 90% tint range, while Highlight areas may fall more into a 5%-15% tint. With Full Color images, things get more intense! You now have 4 different ink colors, all piling on top of each other. If you piled have 4 layers of ink, all at 50% screen, you’ll get a total of 200% Total Area Coverage in that area. If those layers are 80% each, you’ll have a combined 320% Total Area Coverage. As a general rule, 280% is about as high as you want to go, depending on paper type and finish. We usually flag anything above 260% total ink.
Fortunately, with the latest Adobe products, checking your Total Area Coverage has become a simple few clicks of the mouse. Take Adobe Acrobat, for instance: You simply open your image or PDF file, and then open the “Output Preview” window under the “Print Production” tools. Under the window showing your Separations, you’ll see a “Total Area Coverage” checkbox. Click it, select your highlight color (green in our example below), and select 260% in the dropdown box. You’ll see that Mr. Fuzzy-Face has a TON of ink in the background, all over his chair, and most importantly his eyes and nose. Those eyes are where he makes his money, so next we’ll see how to adjust for that!
Fixing the Issue in Photoshop
Generally speaking, there are several ways to adjust for the Total Ink Coverage in your images. The fastest and easiest is in Photoshop, assuming your images are still RGB. We’re going to rely on Adobe’s built-in GCR (Grey Component Replacement) process. GCR is simply this: We want to take those super saturated built blacks, which are causing all of the excessive ink buildup, and transfer some of the built shadow to the Black channel. In this case, Pup-Dizzle’s eyes and nose and chair, start at almost 300% (C=78% | M=70% | Y=63% | K=85%). We want to lower the C, M, Y channels proportionately to not affect the hue, and enhance the black to enhance the darkness.
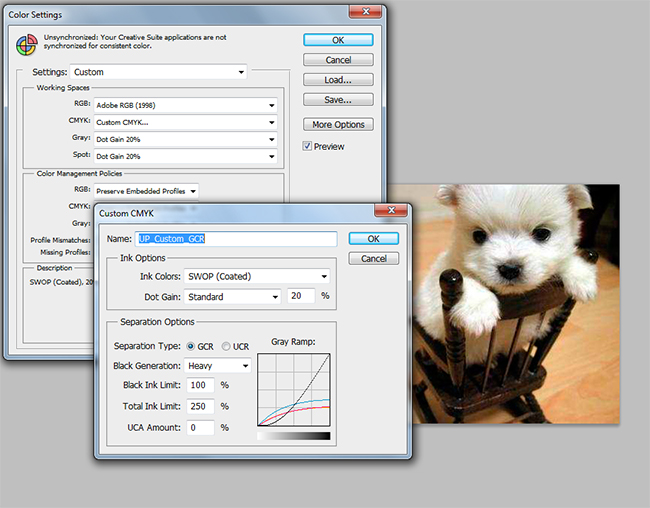
Start by opening your RGB image in Photoshop, and select “Color Settings” from the Edit menu. Next, choose “Custom CMYK…” under the CMYK dropdown in the Working Spaces section of the window. Set the Separation Options to GCR, with Black Generation set to “Heavy” or “Maximum”, and put “260%” in the Total Ink Limit field.
Name this setting and click OK to apply it and also save it for future use. Feel free to toggle the Preview on and off before clicking OK again, and you should notice that in most images, there is very little visual change, but when you set your color mode from RGB to CMYK, most of the shadows are pushed to the Black separation where they belong, and the Cyan, Magenta, and Yellow are simply making the colors colorful. Visually, the picture is almost identical to where it started, but now those shadow areas build differently (C=61% | M=50% | Y=48% | K=95%) with a more manageable 254% Total Area Coverage.
By controlling your Total Area Coverage, you can ensure the best possible results from your photos and graphics. You’ll also run into fewer color shifts, delays due to drying time, and possible quality issues during the finishing process. For more information about how to prepare your files for print, feel free to browse our blog, or contact any member of our helpful staff. Our Customer Service team is always available to point you in the right direction!
![]()
Universal Printing
Offering quality printing and communications solutions to
Raleigh, Durham, Chapel Hill, and the Triangle since 1979.
www.universalprinting.com
Tags: Adobe Photoshop, color correction, commercial printing, G7, Gracol, graphic design, offset printing, setting up your files