Five Ways to Save Money on your Direct Mail!
Have you ever though that the United State Postal Service was confusing? Constant rate changes, endless amounts of regulations, crazy exceptions to ever-changing requirements. What’s more, later this Spring there will be even more changes in place when the USPS finalizes their adoption of Intelligent Mail Barcodes, which will become the only method of barcoding eligible for automation discounts.
In an effort to help our clients better prepare their direct mail pieces, we wanted to provide our Top Five things to consider when designing your mail pieces.
1) Keep it Clean…
When designing your address panel, you need to keep the address area free and clear of any printing that could get picked up by any OCR equipment. Generally the best practice is to keep this area in the bottom right-hand corner of the mail panel, and measuring a minimum of 3 3/4″ in width and 2 1/2″ in height. (Note: the exception to this rule is in newsletters, magazines, or other flats. More on THOSE further below!)
|
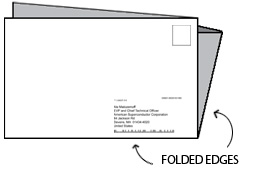
2) Know your Folds… Crucially important in setting up folded pieces, is making sure your address panels are oriented correctly. As a general rule, ANY open edges of your folded piece should be at the top and left of your panel. Right angle folds (in half, then in half again) will have folded edges at the bottom and right of the panel, as shown in the diagram. Trifolded pieces would have the folded edge along the bottom of the address panel. This allows the piece to run cleanly through all of the automated machinery when the Post Office is sorting. More Automation = Better postal rates! |
 |
3) Don’t Crowd the Barcode…
Barcodes help automate the process, which again reduces the cost of postage. Designers are often tempted to add some kind of “vertical line” in the middle of a postcard to seperate the address panel from other information. But there’s a chance that this can get picked up by OCR scanners as part of the barcode, throwing off the presort. Best to let some good old-fashioned “whitespace” do the job.
4) Flats are Different…
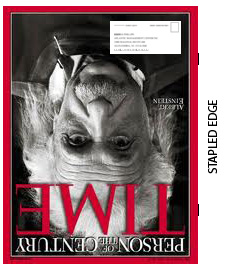
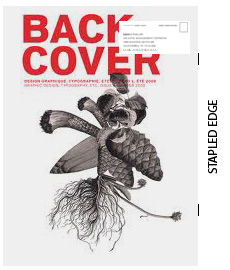
If your piece is bigger than 6 1/8″ tall and 11 1/2″ wide, than it is a “Flat.” Flats will costs more to mail than letters and postcards do, but there are still ways to get some automation discounts. The address block on any newsletter/magazine or other similar piece is at the TOP of the piece, where the folded or stitched edge is to the right. This means if the mailer panel is on the BACK cover, it’s along the top. If it’s on the FRONT cover, than it’s at the lower left corner and looks upside down. This isn’t a mistake… it’s just the way it is.
5) When in Doubt, ASK!
If you’re not sure how to design your direct mail pieces for best use of space, best postal rates, and keeping all postal regulations in mind, just ask! Our Direct Mail / Mail Processing department is always up to date on the latest USPS rules and regulations. You can also consult your local USPS Mailpiece Design Analyst. Follow this link find your local MDA.
For other helpful information about setting up your Direct Mail pieces, visit the Direct Mail Postal Regulations page on our website.
Tags: business solutions, direct mail, graphic design, printing services, Tips for improving direct mail and email marketing