5 Things to Remember for Setting Up Your Files for Printing
Here are a few things to keep in mind when setting up files for printing:
You DO have time to BLEED!
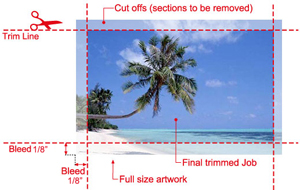 When your images, backgrounds, or borders print all the way to the edge of the sheet, you need to include Bleed. This means those elements should continue at least 1/8” past the trim edge. We will print your project on a larger sheet and then trim it to final size. If you’re submitting a PDF, your PDF should be set up for a larger page-size as well. In short… if your letterhead bleeds, your file should be set up for at least 8.75” x 11.25”
PDFs are GREAT… unless they’re NOT!
PDFs are very handy little files. In fact, they can be the PERFECT format for sending print-ready files. Just remember that there’s no easy way to edit them. Proofread your content BEFORE submitting your files, and check your settings so you don’t lose bleeds or image resolution. For more helpful info about this, read How to Save PDF files for better printing!
Don’t make color a GREY area!
By the time you’re ready to submit your files, you should already know how it’s being printed. Full color projects print as CMYK, so any RGB files might print unexpectedly. Also, if you’re printing with spot colors, there shouldn’t be any RGB or CMYK data in your files. Be clear on how your files color separate, so you don’t have any surprises down the line.
Seriously… it’s NO IMPOSITION!
Imposition is the term used for how many of something runs on a sheet. For example, postcards measuring 4 ¼ “ x 5 ½” will fit 4-up on an 8 ½ x 11 sheet; but if they bleed, you can only fit 2-up on that same sheet. Also, some people will try to set up their business card files with 10 names all on one sheet. DON’T! It’s easier for us, and cheaper for you in the long run, if you just give us one PDF file with multiple pages. We determine the imposition best for your project based on many factors: the artwork, how many are being printed, which equipment your project will run on, what sheet sizes are readily available for the desired paper, etc.
Use the right tool for the job!
There are a lot of software programs out there that create files, but not all of them were designed for commercial printing. True… not everyone has access to the entire Adobe Creative Suite. But there are several free or web-based PDF writers available. Just remember the other rules apply, like including bleed, and knowing that if you’re limited to RGB or CYMK, you’re limited to process or digital printing (unless you spend money having your files fixed.) Also, even those who DO have legitimate graphic software will make rookie mistakes: Like trying to use Photoshop for everything. Image editing programs generally shouldn’t be used for business cards. BUT… if that’s all you have, try to do things like leaving your type as vector, and remembering to include your fonts. When you rasterize type it is going to look terrible, especially if you don’t have your resolution set correctly.
If you follow these 5 simple rules, your print projects will always get on press smoothly and quickly. Not only that… but you’ll be able to get those 1 million COOL POINTS all for yourself! Good luck, and happy file creation.
![]()
Universal Printing
Offering quality printing and communications solutions to
Raleigh, Durham, Chapel Hill, and the Triangle since 1979.
www.universalprinting.com
Tags: Adobe InDesign tips, Adobe Photoshop, commercial printing, graphic design, tips and tricks