Commercial Printing 101 – Yes… you have time to bleed!
Say what you want about the movie Predator, it’s consistently rated on MANY lists as one of the best SciFi/Action/Adventure/Bang-Bang-Shoot-Em-Up movies of our time. It also features on of the best movie quotes of all time (in my humble opinion.)
Blaine Cooper (played by Jesse Ventura) is told by his cohort Pancho, “You’re bleeding, man. You’re hit.”
Blaine’s reply: “I ain’t got time to bleed.”
Of course in the wonderful world of printing and graphic design, BLEED takes on a completely different meaning.
So… what is BLEED?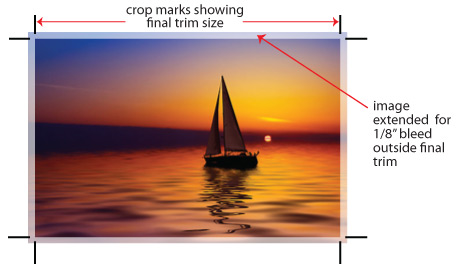

In printing, the term “bleed” is used to describe any time that the printing goes all the way to the edge. This can be photos, background color, bars, shapes, borders, clipart; pretty much ANYTHING that runs off the edge.
In order to make this happen, printing companies will ALWAYS print the job on a press sheet larger than the final size of the piece. When the files are created, they need to be presented to us oversized, with trim marks and bleed. In the example to the right, you see that the crop marks show the cut lines inside of the total image area. Rather than cutting your final piece SMALLER, it’s best if you provide the image LARGER, so that final sizes are accurate.
Why do printers need bleed?
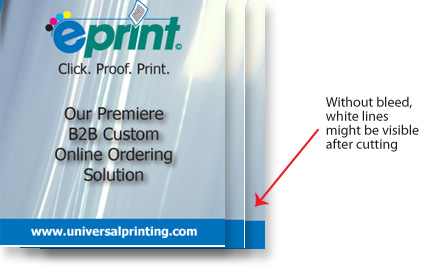
Depending on the type of equipment any printing company is running, there is a possibility of some “bounce” or movement from sheet to sheet. The sheets will always be the same size, but the position of the image can vary slightly. Some digital equipment, for example, might have a tolerance of 1/32″ of an inch in any direction. Doesn’t sound like much, but if one sheet is 1/32″ to the left, and another is 1/32″ to the right, that’s a difference of 1/16″ from one sheet to the next. When these sheets get cut down, there could be white showing on 1 or more edges from sheet to sheet, as seen below.
How do I make sure bleed happens?
Depending on the program you’re using you, you’ll need to do TWO things to ensure that your files include bleed.
1. Make sure your page size correctly.
If your program uses “Artboards” or “Pasteboards” (like Adobe Illustrator, InDesign, MS Publisher, Quark, etc.) then you’ll set your page size to the ACTUAL finish size. Your program will allow you to set your bleed area later.
If your program does NOT use art boards (like MS Word, MS PowerPoint, Photoshop, etc.) then you’ll need to set your page size LARGER (knowing what we’ll need to cut the edges off…. So if you want it to be 8 1/2″ x 11 inches, you could make your page size 9” x 11 1/2″ and know that we’ll cut 1/4″ from all sides.
2. Set guides and margins for trims and “safe areas”
Even if you have bleed set up for your files, you’ll want to keep live type and important elements away from the trim edges. You should keep these things at LEAST 1/8″ away from the trim edge, but 1/4″ is preferable
3. Extend your bleed elements and images
Make sure ANYTHING that bleeds off the edge, is extended at LEAST 1/8″ past the final trim area.
4. Producing your final files
Whether you are printing to a PDF, exporting, saving as, or whatever method you are using, you’ll want to ensure the final page size is large enough to include the extended bleed elements. If possible, crop marks and bleed marks should be added, too.
The point is, no matter WHAT program you’re using, bleed is possible and should be provided. When you are reviewing your files, whatever your final size is, the pages should display slightly larger, as shown above.
Bottom line: If you want to get the best printing results, you need to start with good files. Jesse Ventura may not have time to bleed… but you or your graphic designer do!
If you need further help understanding how to prepare your files for print, feel free to browse our blog, or contact any member of our helpful staff. Our Customer Service team will be more than happy to give you any guidance.
![]()
Universal Printing
Offering quality printing and communications solutions to
Raleigh, Durham, Chapel Hill, and the Triangle since 1979.
www.universalprinting.com
Tags: Adobe InDesign tips, commercial printing, CS5 tutorials, graphic design, Graphic Design Durham, graphic design raleigh